

Note: this is a guide from 4 years ago - due to the new ShipBuilder, this guide is completely obsolete nowadays!
I’ve just updated the How to Build a Ship guide that comes with the game (under the Guides folder) with a step-by-step walk-through on making nice ships with high definition textures.
Here’s the guide as of today!
Overview
Ships in Floating Sandbox can be built by authoring simple image files saved in the png format; you may use your favorite image editor for this, MS Paint works perfectly for example.
The positions of pixels in the image provide the positions of the particles (points) of the ship, while the colors of the pixels map to characteristics of the particles such as their mass, strength, the sound they make when they break, and so on. Floating sandbox comes with two palettes - structural materials template and electrical materials template - that list the colors that you may use together with the various characteristics that they represent. You can find them under the Guides folder of the game.
There are basically two methods to author a ship: a basic method, and an advanced method.
The basic method consists of providing a single png image containing all the information about the characteristics of the ship’s particles; the
simplicity of this method is counterbalanced by the lack of fine-grained control over the final look-and-feel of the ship, as the ship
will be rendered using the palette colors used for the materials, and by a restricted spectrum of electrical materials that may be chosen from.
The advanced method consists instead of providing multiple png images, each providing characteristics specifics to a domain:
A first image provides the “structural layer”, that is, the physical characteristics of particles such as mass, strength, sound, stiffness, and so on;
Another image provides the “electrical layer”, that is, the electrical nature and electrical characteristics of particles such as whether
they are lamps or generators, their conductivity, their luminiscence, and so on;Yet another image provides the “ropes layer”, which contains endpoints of ropes that are conveniently automatically completed by Floating Sandbox;
A final image provides the “texture layer”, which is the image that is visible during the game.
An advantage of using a separate electrical layer, for example, is that you may build a complex circuitry on top of arbitrary structural materials specified separately in the structural layer, such as glass or wood.
The only mandatory layer is the “structural layer”, and this is the layer that Floating Sandbox implicitly assumes it’s loading when importing
a simple png. In order to work with multiple layers instead, you would craft a simple json file that specifies the names of the image files
providing the individual layers. Also in this case the only mandatory layer is the “structural layer”, with all the other layers being optional.
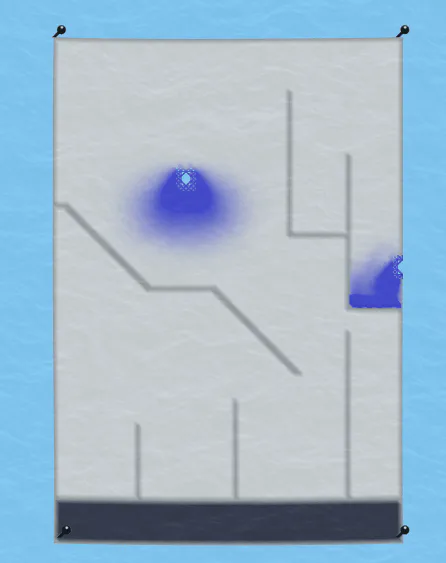
Structural Layer
The structural layer is the most important layer in Floating Sandbox; it provides the locations and the materials of the actual particles that will make up the ship and, if it’s the only layer, also the colors used for the ship. Is it the only layer that is mandatory.
The color of each pixel in the structural layer image is looked up among the color “keys” of the materials structural materials database, and if a match is found, the ship gets a particle with those coordinates (in metres), and of the material corresponding to the color key. As an example, a grey pixel with the “#303040” color becomes a particle made of “Structural Iron”, with the mass, strength, sound, and all the other properties that are specified for the “Structural Iron” material in the database.
Electrical Layer
An electrical layer image provides the electical components of a ship. The color of each pixel in the electrical layer image must correspond to a color in the materials electrical materials database, and the ship particle at that location acquires the electrical properties of the electrical material corresponding to the color. As an example, an electrical layer image pixel with the “#DFE010” color make the particle at the same location in the structural layer acquire the electrical properties of the “Low Lamp” electrical material.
These are the rules to follow when drawing an image for the electrical layer of a ship:
The size of the electrical layer image must match the size of the structural layer image.
For every pixel in the electrical layer, there must exist a corresponding pixel either in the structural layer or in the ropes layer.
The background must be full white (#FFFFFF). An error is generated if a non-white pixel is found whose color cannot be found among the colors in the materials electrical materials database.
Note that it is also possible to specify electrical properties without a separate electrical layer image: you may in fact draw (some) electrical elements directly in the structural layer image, and the corresponding particles will acquire the electrical properties from the same colors in the materials electrical materials database. In this case you may only use the few colors that are present in both the materials structural and materials electrical materials database (e.g. “High Lamp”, “Generator”, and a few others), as opposed to all the electrical materials available in the materials electrical materials database.
Ropes Layer
A ropes layer image is an image that contains pairs of pixels with the same color; for each such a pair, Floating Sandbox will automagically fill-in
a segment (the “rope”) between the two points corresponding to the pixels, each point of the segment being of the “Rope” structural material.
These are the rules to follow when drawing an image for the ropes layer of a ship:
The size of the ropes layer image must match the size of the structural layer image.
A rope is specified via a pair of pixels with arbitrary but matching colors; the coordinates of the pixels will be used as the coordinates of the endpoints
of the rope, while the color will be used as the color of the endpoints and of the ropes.It follows that there may only exist two pixels with the same color. Having only one pixel with a given color will cause an error, as will having
three or more pixels with the same color.
The background must be full white (#FFFFFF). Non-white pixels will be assumed to be part of a rope endpoint pair.
If an endpoint of a rope has electrical properties, those properties are propagated along the first half of the rope. This is useful, for example, to create ropes that conduct electricity, or ropes made of luminiscent material.
Note that it is also possible to create ropes without a separate ropes layer image: you may in fact draw the rope endpoints directly in the
structural layer image, and they will behave exactly as if they were in the ropes layer. In this case however you are constrained to use colors
in the range from #000000 to #000FFF, and the structural material of the endpoints themselves will be the “Rope” material, as opposed to
being whatever structural material specified by the structural layer.
Texture Layer
The texture layer image provides the visible aspect of a ship. Using a texture layer allows the ship to look any way you want, regardless of the materials used in the structural layer.
Images used in the texture layer can be of any size - they are not constrained to match the size of the structural layer; for best results, however, the aspect ratios should fully match. So, for example, if your structural image is 300x100, then a nicely-looking texture image could be 1500x500 (5 times larger in all dimensions).
One thing to keep in mind when building a texture layer is that the portions of a texture that will be visible are those that correspond to structure particles from the structural material. For example, a large rectangular texture over a small circular structure will be clipped to that circle, and only that circular portion of the texture will be visible.
Another thing to keep in mind is that portions of a structure that have no corresponding texture pixels (e.g. because the texture pixels are transparent) will not appear in the ship, causing the structure to look as if it were invisible - it will physically exist and all, but it just won’t be drawn.
Testing for both of these constraints is simple: resize the layer image to the dimensions of the structural image, and verify that for each pixel in the texture layer there is a corresponding pixel in the structural layer, and viceversa.
.shp File
Whenever a ship consists of two or more layers, you must create a shp file to tie all of the layers together.
shp files are simply text files containing json like the following:
			{
    "structure_image":"ss_queen_of_unova_structure.png",
    "electrical_image":"ss_queen_of_unova_electrical.png",
    "ropes_image":"ss_queen_of_unova_ropes.png",
    "texture_image":"ss_queen_of_unova_texture.png",
    "ship_name":"S.S. Queen of Unova",
    "offset":{"x":0.0, "y":-14.0},
    "created_by":"OceanLinerOrca; Gabriele Giuseppini"
}
Here’s an explanation of the elements:
structure image: the name of the file containing the structural layer image. This field is mandatory.
electrical image: the name of the file containing the electrical layer image. This field may be absent if the ship does not have an electrical layer.
ropes image: the name of the file containing the ropes layer image. This field may be absent if the ship does not have a ropes layer.
texture image: the name of the file containing the texture layer image. This field may be absent if the ship does not have a texture layer.
ship name: the official name of the ship. When absent, the ship is named after the filename.
offset: initial position in world coordinates. When absent, the initial position is at {0,0}.
created by: the author of the ship. May be absent.
year built: the year the ship (no the file!) was built on. May be absent.
Note that it is a good practice to rename the various layer image files with a “.dat” extension. The UI dialog that allows users to load ships in fact shows all the png and shp files in a folder, including scattered png layers of ships in that folder, which may be confusing as loading an electrical layer image as a ship, for example, would yield unpredictable results. Changing the extension of layer image files instead would prevent the dialog from allowing the user to select an individual layer image.
Note that you may also create shp files for single-layer ship; the advantage in this case over a png ship is that you may customize ship metadata such as its initial offset and the ship name, among others.
A Walkthrough
A good way to get started is to first create a large (hi-definition) texture image for the texture layer, then copy and resize this image for the structural layer, and finally fill-in the structural layer with material colors. Here’s how to do just that:
Decide your new ship’s dimensions: a good starting point is 240 meters wide and 70 meters high (the dimensions of the RMS Titanic that comes with the game!)
Create an empty image 8 times larger than that, in our case 1920x560; this will be our texture layer image.
Draw the ship with any colors you’d like - when drawing the texture layer you don’t have to follow the material palette. Draw fine details here, this is how your ship will look like after all!
Make sure that the image is transparent where there’s no ship.
Once you’re done, save the texture image as a png file; call it for example “my_new_ship_texture.png”.
Now resize the image down by 8 - you should end with a 240x70 image; this will be your structural layer image.
Draw pixels over the pixels of the resized image, this time following the structural material palette. These pixels will be your particles, having the material corresponding to the palette color. Make sure you cover all of the resized image’s pixels. For this image, you should think of describing the “inside” of the ship - its beams, decks, shafts, hull, and so on.
Use only hull materials for those pixels of the structure which will have contact with sea water, or else water will flood immediately when the ship is loaded. Watch out for diagonals - two hull pixels that touch each other only on their corners will still allow water in.
Make sure that when the texture image was transparent, the structure image has white pixels instead. You may probably just flood the “outside” area with white to achieve this.
Once you’re done, save the structural image as a png file; call it for example “my_new_ship_structural.png”.
Create a text file with the following content:
Save the file as “My New Ship.shp”
Load the ship end enjoy it!
To avoid seeing the texture and structural images as ships in the “Load Ship” window, rename the images as “.dat” - and don’t forget to update the shp file as well!


24 comments