
I'd recommend reading the article on the first games' debug menu before reading this, as I'm going to gloss over some details for this one that I've already covered.
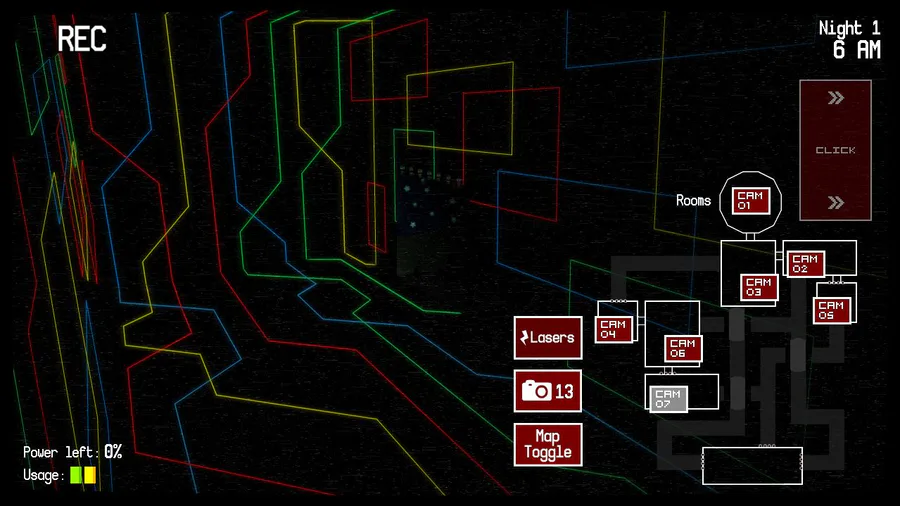
So the second game features a more robust debug screen compared to the first one, as there were far more things to keep track of when designing the game. Having the first game under my belt, I was more willing to tackle some more complicated aspects of the next fan-game. One example of that is the monitor button; In the first game, the player simply clicked on the button to toggle the monitor, as this was much easier for me to program. In the second game, the monitor is controlled like the first two 'FNaF' games; The player moves the mouse over the button to toggle the monitor.
In tackling these more complicated problems, I wanted the debug screen to showcase more information, as there was a far greater chance of glitches and complications occurring during development.
Activating the debug screen is a little different compared to the first game. First, you have to enable debug mode: This can be done at any point during game-play by holding 'C' 'H' 'Z' and pressing 'CTRL.' When debug mode is on, text will appear in the top left corner that states: "Debug Access Enabled"
From this point, holding 'C' 'H' and pressing 'CTRL' will toggle the debug screen on and off.

Much like the first game, the top left showcases values that pertain to the characters in-game. White counters delay character movement, and cyan counters refer to character position. The red counter lined up with the cyan counters is the position counter for the sensor that's carried by a 'John-Head.'
Yellow counters delay how long until a character leaves your office when the power is off. Typically, this counter ranges around 100 to 120 for each character, with the exception of Edward, whose counter ranges from 120 to 140.
The dark-red and purple counters delay how long until a character jumpscares you whilst the character in question is in the office, and the player has the monitor up; This is to prevent the player from simply keeping the monitor up and winding the music box the entire night.
The dark green counter indicates if a 'John-Head' has grabbed the sensor; 0=No, 1=Yes.
The magenta counter is another "RNG Generator" for character movement, only in this game, the only character to have random movement is the 'John-Head' carrying the sensor.
The leftmost brown counter is how long the music box can be fully drained before the John jumpscare can be initiated; It changes value constantly based on the current night, but will drain to 0 when the music box counter (The bright-green one in the bottom left) is at 300.
The rightmost brown counter is how long until after the leftmost brown counter is a 0 will the John jumpscare occur.
The pink and light-blue counters for 'Cinos' and 'Josh' are how long until the player can be in the monitor before they pull it down; These counters drain to 0 when their respective characters move into the office, and the monitor is up, otherwise, they're set to 45 and 35 respectively.
The light-green and light-purple counters delay how long the player can stare at either 'Cinos' or 'Josh' before their respective jumpscares occur, otherwise, they're set to 60 and 50 respectively.
The orange counter indicates whether or not a jumpscare is occurring; 0=No, 1=Yes
Around the middle-left of the screen are two separate white counters; the top one is the time in seconds, while the bottom one is the point in seconds when the muffled banging sound occurs during game-play.
The blue-green counter below the white counter controls the various Easter eggs in the office; the counter picks a random value between 1 and 802 whenever the monitor is brought down. Depending on the value, certain Easter eggs will occur; for example, when the counter is greater or equal to 801, the doll in the office will appear in the bottom right.
The two light-grey counters control monitor movement; the left one indicates when the monitor is rising, while the right one indicates when the monitor is falling. Having these actions handled by two separate counters allows for the monitor to be manipulated outside of the players' own control, such as when a jumpscare needs to occur.
The dark-grey counter is the current camera value selected; this allows the value to be saved when the monitor is closed, so it doesn't reset to a default camera view when opening the monitor.
The white counter indicates whether the power is on or off (0=On, 1=Off)
The blue counter controls how long until after the power goes out can the player press the power button to turn it back on.
The two diamonds in the center of the screen are used to control the screen scrolling in-game, but this method of screen scrolling is a bit antiquated, from what I understand, and is part of the reason why these games force full-screen by default.
The large numerical boxes on the right are the hit-boxes for the camera buttons; they have hit-boxes larger than the actual camera buttons to make them easier to click, without feeling intrusive or even noticeable during game-play.
And that's it for the second game. As for the third game, it does have a debug screen, but it's nowhere near as robust as either of the first two games. To save on both file size and clutter, I used Clickteam Fusion's debugger far more to test object values during development, so the debug counters in-game are just generic counters I assigned to various different actions, depending on what was needed at the time. It does show a few more details, but it's nowhere as intricate.
If you like, debug mode can be enabled by holding 'C' 'H' and pressing 'CTRL,' though unlike the second game, it can't be toggled on or off.


0 comments