
This is our official walkthrough for Simulacrum - Chapter One. Hover over the section you need help with in order to see the text.
Chasm Room Puzzle
By turning off your flashlight you can cross the chasm in the room and get to the other side. Taking the SILVER SEED there will open the elevator where you can reach in and grab the CRIMSON KEY.
Seed Puzzle
Find the BRONZE SEED in the crematorium which is accessed from the bottom of the stairwell.
Find the SILVER SEED from solving the chasm puzzle.
Find the GOLDEN SEED in the room with the smashed jars and the sink.
By using the text in the Bridge to Erewhon fairytale you can work out where each seed goes inside the holes at the back of the room behind the grates.
(Note north is directly up on the camera closeup of the holes)
North: BRONZE SEED (Because bronze has to be opposite to silver)
East: Empty
South: GOLDEN SEED (Because the hiker didn't come from the mountains and gold has to be opposite to bronze)
West: SILVER SEED (Because the magpie's feathers are wet, which is from water from the lake in the west)
Valve Puzzle
The four plaques refer to the seasons, and each valve opposite to each plaque connects a colour to each season. One word in each line in the riddle on the wall refers to a colour. The colour associations are explained in the "Ceremonial Artistry" memo (found in the south of the map). Blue for sorrow. Red for anger. Green for envy. Black for death. The rest of each line refers to a season.
Sorrowed child plays in light refers to summer, so the summer valve must be blue.
Angry forests at their end refers to autumn, so the autumn valve must be red.
Envious birds flying north refers to spring, so the spring valve must be green.
Death on a freezing night refers to winter, so the winter valve must be black.
Crematorium Puzzle
Get the BOX OF MATCHES from the room with the four key holes (the room marked with 'not your home' on the map). Get the JAR OF OIL from behind the bars near the clock with roman numerals (accessed by solving the Seed Puzzle).
Use the JAR OF OIL on the sink.
Use the BOX OF MATCHES on the sink
Now this has lit up the cremation oven in the crematorium in the lower tunnels. Look through that peephole there and note down the symbols you see. You'll need them to solve the Three Door puzzle.
Three Door Puzzle
Use the SCREWDRIVER, found at the bottom of the stairwell, on the wounded wall in the main corridor.
Go through the hole. Then use the combination of symbols found from solving the Crematorium Puzzle and enter each door in that order.
You'll enter a new room. Take the VERDANT KEY from here.
Rune Lock Puzzle
In the chambers below the pool, the two tablets on opposite sides of that area are the same writing, both in English, but in different scripts/fonts – one runiform (rovásírás) and the other one using the modern English alphabet.
In the room with the runiform tablet, there is writing on the wall, including a green word at the end – that is your keyword. Find the keyword in the text on the English tablet, then compare the runiform text with it and find the keyword at the same position in the text. Now you know the right symbols to put into the lock. (Watch closely! Some of the symbols are very similar to one another.)
Lever Puzzle
Use the LEVER received from solving the Rune-Lock Puzzle and place it into the empty lever stand on the right of the main room. Pull this lever. Go to the opposite lever, take the CLOCK NEEDLE when prompted. (You may consider saving the game at this point, the next part can be tricky.) Now pull that lever too.
You will have limited time to keep both levers up and get the gates fully down so you can escape. When the gates are down, run through the corridors and into the room with the bed at the end, then jump down the red-glowing hole.
Tip: Since there is a random element to when which lever will drop, your safest bet is to stand in the centre between both levers while waiting for the next lever, to minimise the distance.
Clock Puzzle
You'll have to solve the valve puzzle first. This will lead you to an area where you then get the CLOCK NEEDLE from the jammed lever.
Back in the main corridor, use the CLOCK NEEDLE on the door with the clock face.
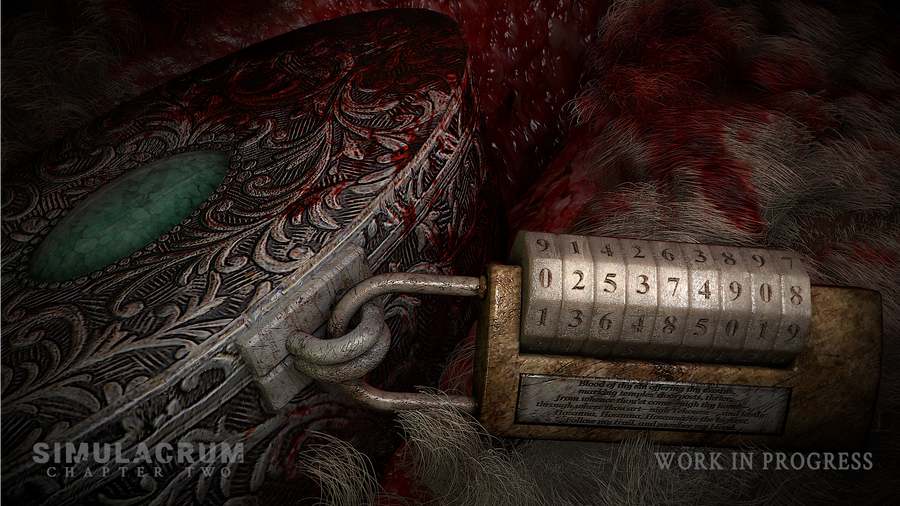
The three clocks scattered around are now accessible. Use the riddle inside that room you just unlocked with the CLOCK NEEDLE, along with the hint "The Moon Bleeds, 1982" to solve this puzzle. Each line on that riddle has a number, a zodiac symbol and a colour. You have to enter a combination of symbols four times in total from the lines 1, 9, 8 and 2 in that order. The colour of the line denotes whether it is a sun (blue) or moon (red) because the moon "bleeds" and the colour of blood is red.
First Combination (Monarch of beasts is a lion, so the symbol is Leo):
Numbers Clock: 1 | Zodiac Clock: Leo | Sun/Moon Clock: Sun
Second Combination (Weight of a soul refers to scales, so the symbol is Libra):
Numbers Clock: 9 | Zodiac Clock: Libra | Sun/Moon Clock: Moon
Third Combination (Pawn under darkened tide is a fish, so the symbol is Pisces):
Numbers Clock: 8 | Zodiac Clock: Pisces | Sun/Moon Clock: Sun
Fourth Combination (Doppelganger under the moon is a twin, so the symbol is Gemini):
Numbers Clock: 2 | Zodiac Clock: Gemini | Sun/Moon Clock: Moon
Once solved you'll hear bells ringing. Go inside the Clock Room and go down the spiral staircase that loops around the clock device. At the bottom, take the OCHRE KEY.
Season Key Puzzle
Simply use the coloured keys found from earlier puzzles on their corresponding colour locks.
Green = VERDANT KEY obtained at the end of the Three Door Puzzle.
Red = CRIMSON KEY obtained at the end of the Chasm Puzzle.
Orange = OCHRE KEY obtained at the end of the Clock Puzzle.
Blue = AZURE KEY obtained in the storage room after getting the clock needle.
You'll gain access to a door in the centre of the room.

5 comments