
— English Ver. —
Hey all, today we’ll talk about level design. And how exactly do you design a level for a platformer? There’s probably a thousand ways to do so, it isn’t an exact science after all, but I’m gonna talk about the process I’ve been following.
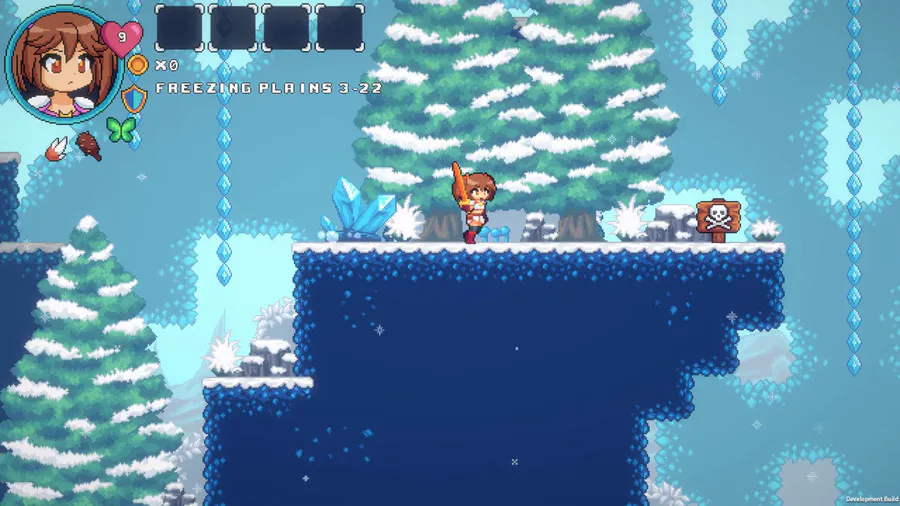
First, choosing a theme for the level. This can either be a thematic choice (Let’s make an ice level, or a lava world, etc.) or it can be a gameplay-focused choice (Let’s make a level that teaches the player how to use the double jump). This can help to focus the elements that you want to include in the level in order to give the feeling that you want to cause. In this particular level that I’ve been working on, the theme is more or less a showcase of the basic mechanics of the game, to give a “compressed” version of the Split Mind Experience™.
The next step would be to make a list of all the important step or bullet points that you want to include in the level, the setpieces that the player will encounter along the way. For example, these are some of the points I’ve made for this showcase level:

First encounter with enemy type #1
Introduction to jumping
Ambush by many enemies of type #1
Introduction to double jumping
Introduction of enemy type #2
Learning about collectible memory fragments.
After creating a list like this, I would start to plan out the overall layout of the level by using a rough sketch, always keeping in mind the order in which the player should encounter each point of the list. From this sketch, you can get a sense of the overall flow that the level should follow, and it can be easy to change the layout if it feels too uninteresting or unclear, in the case of this level, the initial feedback we got suggested that we should lengthen the initial platforming section of the level, to include more time for the player to get used to the feeling of the jumping in our game. The overall theme of the level also changed during development, since the initial concept for this level was that it was supposed to be a continuous descent, symbolizing the fall into despair in the mind of our character, but the concept later changed into one of simply an initial descent, followed by an ascension.
Once a layout has chosen, we can start to really create the level in Unity, using the sketch made previously as a blueprint. The end result might still be pretty different from what was planned before, since sketches are rarely made to scale, or the assets that were originally planned to be used are still not finished.

Now, the most important step in creating a level is to actually test it out. Play it many times and take notes and feedbacks about how the gameplay feels, platforms might need to be altered to make certain jumps easier or harder, and the enemy encounter design might also need to be changed in a similar way. One thing to keep in mind is that any changes made to the fundamental gameplay mechanics will likely have a ripple effect on any levels previously designed, so more changes will probably be needed in the future as we further develop these mechanics.

That’s all for today, I hope this entry has given you an interesting look behind the scenes of Split Mind!
— Spanish Ver. —
Saludos a todos, hoy voy a hablar sobre diseñar niveles. ¿Cómo se diseña un nivel para un juego de plataformas? Puede que haya mil formas distintas de hacerlo, pero voy a hablar de los pasos que he seguido en este proyecto.
Primero, elijo un tema para el nivel, que puede tratarse del ambiente del mundo (Por ejemplo, hagamos un nivel de hielo, o de lava, etc.) o también puede basarse en la jugabilidad (Por ejemplo, un nivel diseñado para enseñar al jugador cómo usar el doble salto). La elección de un tema permite la focalización de los elementos que se quieren incluir en el nivel para obtener el efecto deseado. En este ejemplo de nivel, el tema elegido consiste en mostrar las mecánicas básicas del juego, para aportar una versión “compacta” de la Experiencia Split Mind™.
El siguiente paso consiste en hacer una lista de los elementos que se incluirán en el nivel, los puntos más importantes en el camino que seguirá el usuario. Como ejemplo, éstos son algunos de los puntos de la lista que he escrito para este nivel:

Primer encuentro con enemigo de tipo #1.
Introducción a los saltos.
Emboscada de varios enemigos de tipo #1.
Introducción al doble salto.
Introducción de enemigo de tipo #2.
Introducción de los fragmentos de memoria como elemento coleccionable.
Tras crear la lista, comencé a planificar la estructura del nivel mediante un boceto, ordenando el orden en el que el jugador debería encontrarse con cada uno de los elementos de la lista previa. Usando éste boceto, puedo empezar a pensar sobre el “flujo” que debería tener la jugabilidad, y también es una herramienta útil para ver si hay que cambiar algo de la estructura si resulta ser demasiado confusa o poco interesante. En el caso de este nivel, el feedback inicial que recibimos indicó que deberíamos de alargar la sección inicial de plataformas para permitir que el usuario tenga más tiempo para acostumbrarse a usar el salto de nuestro personaje. También cambió mucho el enfoque temático del nivel, ya que el concepto inicial era que todo el camino del jugador fuese un continuo descenso, para simbolizar que nuestro personaje se pierde en la oscuridad, pero el concepto evolucionó hasta ser un descenso inicial que posteriormente da lugar a una subida victoriosa.
Tras aprobar la composición del nivel, podemos comenzar a crearlo en Unity, guiándonos por el boceto creado anteriormente. Aun así, el resultado puede ser bastante diferente de lo que se pensó en un principio, ya que muchas veces la escala del nivel puede cambiar mucho, o porque los recursos que se iban a emplear en un principio aún no están acabados.

Finalmente, jugar y probar el nivel es el paso más importante del diseño de niveles. Hay que jugarlo una y otra vez, enseñárselo a otros y tomar nota de opiniones y feedback sobre la jugabilidad, puede que haya que alterar la posición de plataformas para hacer que ciertos saltos sean más fáciles o difíciles, o cambiar la posición de los encuentros con enemigos. Otra cosa fundamental es que hay que tener en cuenta que todos los cambios de las mecánicas básicas del juego que se realicen posteriormente pueden tener grandes consecuencias en la jugabilidad de los niveles diseñados anteriormente, por lo que es importante revisar los niveles cuando se producen estos cambios en las mecánicas.

¡Esto es todo por hoy, espero que esto haya sido una perspectiva interesante al proceso de desarrollo de Split Mind!


0 comments