
Comments

No comments yet.
Free
The Collaborative "JadeJohnson Games™" And "JadeJohnson Films™" Smart Actions Menu Video Accessibility Filter (For Windows PowerPoint [PPT] 2010+)
The windows version of PowerPoint 2010 or newer is required in order to utilize this accessibility tool.
Free
The Collaborative "JadeJohnson Games™" And "JadeJohnson Films™" Smart Actions Menu Video Accessibility Filter With One Sample Video Included
This package comes with one sample video on which you can test out the versatility of the filter, so that you don't have to go through the trouble of inserting and setting up your own footage. Once you study how it works, you can replicate it with the original package at your own pace, as there are instructions on this very page. The Windows version of PowerPoint 2010 or newer is required for this accessibility tool to properly function at all.
"Smart Actions Menu 2020" is an overlay based video accessibility filter client for Microsoft PowerPoint, which works with MP4 files, and some other natively supported video formats (such as WMV and AVI) that can be up to five minutes in length. It gives you free control of PowerPoint's native 2D transparency, colour, brightness, and contrast modulation features to individually tailor each video it's fed to your own personal visual needs!
Controls:
Select the face model of JadeJohnson in the lower left to trigger or deactivate the menu.
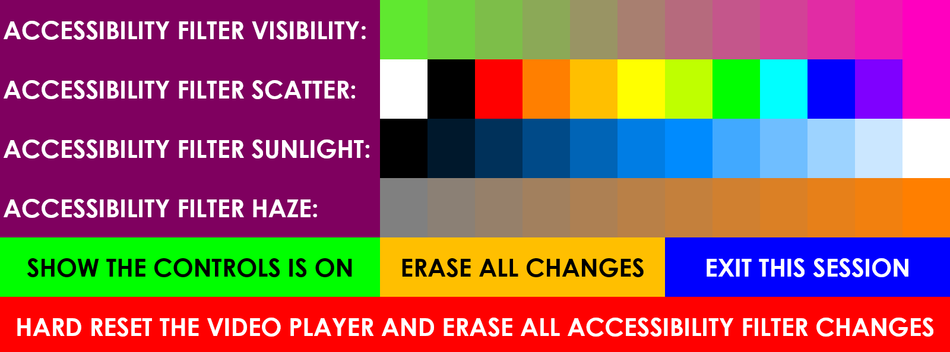
• Visibility:
Sets the transparency balance between the filter overlay and anything displayed behind it.
• Scatter:
Changes the colour of the filter. The filter must first be made at least partially visible in order to see the change in its hue.
• Sunlight:
Increases or decreases the brightness of the underlying content.
• Haze:
Changes the level of contrast seen in any objects beneath the filter.
• Show Controls:
Shows or hides the overlay control panel. When on, it's green; when off, it's red.
• Erase All Changes:
Jumps back to the previous slide, which is used as a buffer to reset the filter. Useful to fix any input glitches.
• Exit This Session:
Leaves the current instance of the video player and closes its containing window.
• HARD RESET THE VIDEO PLAYER AND ERASE ALL ACCESSIBILITY FILTER CHANGES
Fully resets PowerPoint to the first slide and completely initializes the video player's accessibility settings to their creator defaults.
How To Import A Video
• Open PowerPoint from its shortcut on your device.
• Hold the CTRL key down and press o to open a file.
• Browse to the "Smart Actions Menu 2020" file and click "Open".
• Don't mess with the first slide — the black one, that's a buffer for the filter.
• Select both slides in the left pane, and press CTRL+D to duplicate them until you have enough copies to equal the total number of videos you want to import. It's best to leave an extra duplicate in case you want to add more footage later.
• To insert a video behind the filter, go to Insert, Video, From File (Or From My PC), and browse to the video to insert it. Move it to the top left corner, stretch it to fill the whole slide, then go to "Arrange, Align, Align Middle"; "Arrange, Align, Align To Center"; and "Arrange, Send To Back".
• Go to "Animation, Animation Pane". Click once on the "Pause Animation", then right click and remove it.
• Next, scroll up to the "Media Play" animation, right click it, and choose "Timing". When the dialogue box pops up, select, "Start, With Previous", then press "OK".
• Finally, go to "Transitions, Automatically After:", and enter "0.01", then push the ENTER key.
• When you've followed these steps for all your videos, you can press CTRL+S to save, then open the file from your file explorer, and you can customize the appearance of the filter for each and every individual video; unfortunately, saving settings for the long term is not supported at this time.
Please enjoy, and as always, "Happy Jading!™"
#Accessibility #Adaptive #Technology #Assistive #Software #Blind #Low #Vision #Visually #Impaired #Challenged #Sightless #Without #Limited #Eyesight