Last week we spoke about basic lighting principles. This week we are going to take a look at more complex lighting principles. So lets jump right into the thick of it.
The anatomy of light
To create realism or add that special something to your stylised work, it's important to understand how to light acts on objects.
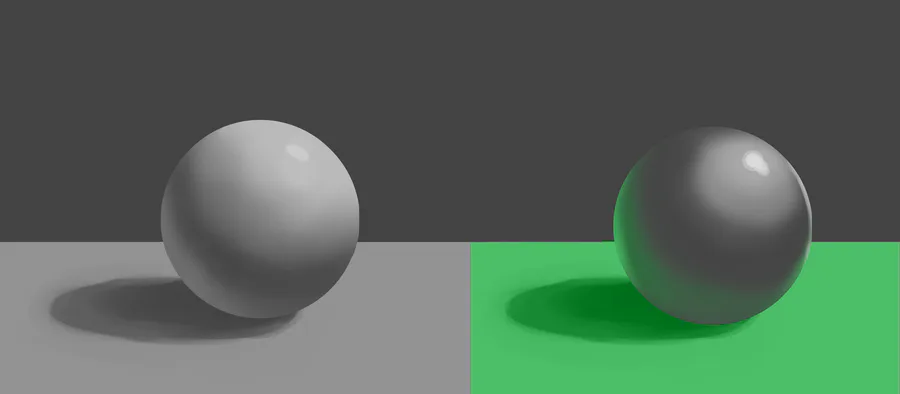
Below is a diagram of light, lets go through each concept and see how it's used in creating an image.

Light, Shadow and Midtone
We already discussed these principles last week. If you haven't seen that post you can check it out here.

The Cast Shadow
Every object casts a shadow, we call this a cast shadow. It's the main shadow that appears on objects that are close to your subject. The cast shadow indicates distance. The closer your subject is to something the smaller, darker and harder the cast shadow will be. The further away the lighter, larger and softer the cast shadow will be.

Reflected or Bounce Light
If you want to make your work look extra professional this is the key to doing it. Bounce light is something often overlooked by beginner artists, it's hard to learn this principle without some one pointing it out as bounce light is very subtle. Light is emitted from a source in all directions and when it hits an object it bounces. The intensity of this bounce will depend on the material and colour of the object reflecting the light. For example something siting on a white table will have more bounce light than something sitting on a black table. Bounce light also takes on the colour of the object it's bouncing off of. So if you're working on an outdoor scene then the sun reflects off of the sky which is blue and then onto your subject, this is why you will almost always see daylight scenes with cool tones in the shadows. More on this in a later assignment.

The Terminator (Core shadow)
The terminator is the darkest part of your shadow. As new artists it's easy to think that the darkest part of the shadow is the part furthest from the light source, but because bounce light exists this is not true. Your darkest part is the part n the middle of these two light sources.
Core shadows can also be lengthened to create more reflective surfaces. The more intense the core shadow the more light is being reflected by the object, and the less intense the core shadow the more light is being absorbed by the object. (And they said art isn't a science.)

Highlights
Highlights are the star of the show for a lot of artists, it's that finishing touch that adds life to a piece. But so many beginner artists don't seem to understand how highlights work.
Highlights are a way to show how rough or reflective a material is. The smoother the more intense and small the light is, the rougher the dimmer and softer the light is. The more reflective an object is the more likely it is to have a rim light. This is a concept we will touch on in the future. But this is also a highlight of sorts and should be used on metals and wet objects.

Edges

Often, you'll hear artists talking about "edge work". This is how we refer to the types of edges used in an artwork and how they are used to convey shape.
There are 3 different edges we can use to define the changing of plains.
A soft edge - Where light wraps around an object creating a soft gradient. This often indicates that the object is curved or round.
A hard edge - The point where two edges meet and the colours used immediately change without a gradient. This indicates the edge of an object or an immediate plan change.
A lost edge - when the colour of an object and it's background are the same colour leading to no edge being seen. This happens in dark scenes or when an artist is trying to draw the viewers eye somewhere else on a piece by cutting a way the detail that would have been in the lost edge.
This week the assignment
Shade these 3 shapes to make them apear 3D and post the results in the comments.

Additional tutorials
For more detailed anatomy tutorials check these out:
CG Cookie's Concept Art Fundamentals
Moderndayjame's EDGES IN PAINTING
Craig Mullins Part 7: Edges
Paintable - How to Fix Blurry Digital Paintings and Paint Crisp Edges with Hard and Soft Brushes
Marco Bucci - Learn to see like a painter ... with edges!
Next week we will be painting our first portrait!
Good luck with your assignments. Have fun!


6 comments